Showing posts with label graphic illustration. Show all posts

Monday, September 15, 2014

The Art Challenge: Progress Report

Hello!
I've been working really hard on my art challenge the past couple weeks. I wasn't going to show you the progress until I had finished it a bit more, but I was informed it might help inspire any of you who are doing challenges to keep working if I post my progress. So here it is!
I had a really hard time starting this challenge. It was bizarre! I have all the ideas, I can even envision the final pieces in my head, color and all, and I just didn't want to start. I think mostly it was a fear of not being able to put what I was envisioning on to paper. Then I found this really cool artist (as in musician) that my friend introduced me to, and I was really inspired by her music. Since I was feeling creative every time I heard one of her songs, I decided to just listen to her album on repeat and start drawing. Guess what? It actually worked! (In case your curious, the artist is LP. check her out! Here is her website). Now every time I don't feel like working on my project, I start playing her album. So far it's really working for me. Maybe if you are stuck, you should find a new artist that inspires you. It worked for me, it could also work for you!
So here is my process for this challenge (and really any piece I am working on):
The first theme I picked to illustrate a series for was bullying, or being picked on. First, I write down any and all ideas that come to my head and draw the roughest thumbnails. These are so rough I think I am probably the only one who can decipher them. Also, for this series, I had it pretty clearly in my head, so I didn't need as many thumbnails.

The scribbled notes in my little sketchbook. As you can see, the thumbnails aren't much of anything
Then I start making tighter, but still loose, sketches in my sketchbook.


Then, I traced everything onto tracing paper. This enabled me to make everything clean, figure out stuff I wanted to take out, and make the picture a little more legible to me. I traced it with pencil because I wanted that kind of line in my final piece.


Then I added color and texture in photoshop. I've only "finished" one so far, but here is a look.
I wanted to work in a limited color palette to really challenge myself.
I showed these to my friend Olivia who is also doing this challenge (don't forget to check out her tumblr to see her work!). I also showed these to a group of illustrators I have been meeting with every couple of months. They were all able to give me really good feedback, so there will be some changes to these sketches the next time you see them. They also inspired me to make this into a longer story! I think for the purposes of my challenge, I will still only try to finish 6 of the pieces, but I may add the other sketches if I have time.
Now it's time to get back to work. I have a lot to do! Hopefully, this was inspirational for your Monday. How are your projects going?

Friday, August 8, 2014

A Wedding: Starting the Roadtrip

Hello again!

Yes, I know it's been awhile, but I have so much to write about now, I think I can post more within the next couple months. I just have felt so inspired in the last couple of weeks I am not even sure where to begin! I guess I should start at the beginning of the road trip in California I just did.

Let's start with the wedding I went to 2 weeks ago. (I can't believe it's already been 2 weeks! Time sure does fly when you are having fun!) Two of my closest friends tied the knot on July 26th in San Diego. My sister and I traveled together to the wedding. We got in the day before, but because we had had a CRAZY week before, were so exhausted all we could do was take out our wedding clothes and crash. Of course, because of the time difference, we woke up at 5 a.m. and couldn't get back to sleep. The wedding was at 12:00, so we had a lot of time to get ready!

One of our friends met us at the hotel so that we could get ready together, but we still had so much time to kill. It was the first time I had ever been ready early for a wedding. We made our way to the church and actually managed to get there just in time, even though we were ready early. (It took us some time to figure out the gps).

The wedding was beautiful. The bride looked gorgeous, and the groom didn't look too nervous. It was the first wedding I have been to that I am really good friends with both bride and groom, and it was so exciting. I am so happy for them!

The reception was at a vineyard nearby, and it was lovely. I didn't take many pictures because the camera just couldn't capture the prettiness of the interior. You really needed to see it all at once. The dinner was delicious, the toasts were heartfelt with just the right amount of humor and tears, and the dancing was so fun! We didn't know many people there, but we still had a blast.
My sister and I with the bride and groom
We were also huge fans of this orange tree outside the vineyard.

All in all it was one of the most fun weddings I have ever been to.

Wait, you say, where is the art?? No worries, I am getting to it!
I was really happy to be able to do the invitations for my friends. They were so easy to work with, and so understanding about timing, etc. I think it helped that my friend Cathie is a graphic designer, so she knew a lot about how this kind of stuff works.
When I started designing, I was a little lost for ideas. They were having the reception at a vineyard that looked like a castle, her colors were a wine color and hydrangea blue, but they didn't want anything too flowery. I didn't want it to be corny, which I though trying to do a castle idea might become. Then I got the idea to do a vine, like a grapevine, but instead of having grapes, I would do polka dots in a more graphic design kind of way.
I was really happy with the result:
The final invite...or so I thought
Then came printing. I took them to the printer I usually use, and...the color was NOT right. Not even close. I panicked. This had never happened to me in all the times I had used this printer. They were so helpful and let me sit at their computer for an hour trying to fix the colors, but the printer was calibrated incorrectly, so everything I did came out too yellow, too grey, too purple. I couldn't figure it out. I called the bride with dread to tell her we were going to have to change the design, and she was super ok with it! I was so afraid she would freak out (and she would have had every right to), but she was so calm and understanding, and even offered some suggestions (The benefit of designing for someone who has dealt with this stuff before!).
So I had to change the color. It still took me about half an hour at the printer to make it right, but this time I was able to get it close. 
The full invitation

The main card

the rsvp. It was a postcard. They came up with the wording and I loved it!
The other cards
Honestly, once I had glued and glittered and assembled all the invitations, I was really very happy with the color change. It made the invitations look much more elegant, and they were so pretty. So I guess all the stressful hours were worth it! The bride and groom were very happy, so I was very happy. 

Unfortunately, I can't use the printer again because I can't do that to a bride and groom again. I love supporting small business, so I am upset I won't be able to use them again, but....I did get a new printer! Now I will be printing invitations myself. I got a printer I can print 5x7 cards on, and a nice paper cutter, so I won't be spending hours and hours again cutting things. It was probably good that this happened, because I needed a new printer anyway, and now I will be producing and monitoring the quality all myself. My next purchase will be a nice camera so I can take better pictures for this blog!

It was really fun to do these invitations, and a really fun wedding!
Be on the lookout for more blog posts about my trip!


Thursday, January 10, 2013

Happy New Year! A quick recap of 2012 and some resolutions

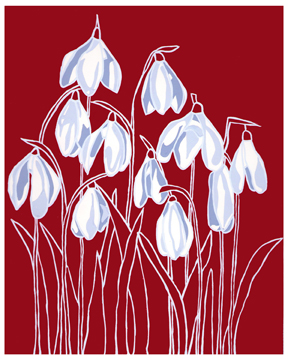
Happy January! "January Snowdrops" from my 2013 calendar. buy it here 8x10 or here 5x7
Happy New Year everyone! I hope your holidays were filled with family, love, and laughter.
2012 was a good year for me with my art. I put together a portfolio, created a new website, updated here more than previously, designed a logo, designed a tattoo (2 of my first paying jobs as an illustrator!), designed wedding invitations for one of my best friends and my sister (you'll have to wait until July to see them!), FINISHED a big project I created for myself (my 2013 calendar), started an etsy store, and sold all the calendars I had printed, plus some prints of my paintings.
I am very excited to start 2013. I have so many ideas that my fingers are itching to complete. I am hoping that 2013 holds so many more accomplishments for me as an illustrator than 2012, that I can't even recount them all here at the end of the year!

Of course,  the new year comes with new resolutions for my art career. I am sharing them here with you so that I know I have people counting on me to complete them. Here they are:
1. draw everyday
2. create more work
3. start contacting publishers with book ideas
4. update my blog, website, and etsy regularly
5. experiment with showing my work on other social media platforms
6. Have fun doing whatever I end up doing
Trying to keep it somewhat short and simple so I can keep track of my goals. Of course, knowing the way I work, I am going to end up creating outlines of all the stuff I want to do and get overwhelmed.

My goal for this week is to finish some valentine's day designs I am working on, do illustration friday tomorrow, and start some of my other projects. I'll keep you all posted. :)

I really am excited for 2013. I think it will be a good year for me as an artist. I hope those of you who read this blog will continue to follow me as I grow as an artist this year and my portfolio grows!
Happy New Year again!

the front of my 2013 calendar. I don't have more printed; however, I will be offering them until February 1st. Send me a message on etsy or put a calendar in your cart,  if you want one!


Wednesday, October 17, 2012

October Marigolds

Hey all!
just a quick update before I get back to painting. (I have A LOT of work to do).
Here is the painting for October of my calendar. Marigolds are the flower for October, and we happen to have a lot of lovely marigolds in our yard, so I was able to get lots of great reference. The birthstone for October is opal, which I ran into problems with. Since I have been painting SO graphically, I wasn't sure how to do opal, since it is iridescent. However, after talking to my sister who happens to have an October birthday, she said a lot of people use rose quartz as the birthstone for October. Because opal does have some pink in it, I thought this was a good compromise for the painting.
What do you think?
 Now on to August!

Wednesday, October 10, 2012

Illustration Friday: Mirror


I took a break from what I should be doing (my calendar) to illustrate this week's Illustration Friday topic since I really REALLY wanted to. This is an illustration of me and my sister (much younger of course!) I tried adding a little colored pencil to the illustration this time as opposed to only using gouache. Let me know what you think! (I, of course, am the left handed one, and in yellow)
"Elizabeth and Anne had always been told they were mirror-image twins. They, however, didn't really care as long as it meant they always had someone to play with"

Thursday, August 9, 2012

I'm Back!: First Summer Project

It's been pretty quiet here on this blog, sorry for the lack of updates! Summer seems to fill up so quickly, with family visiting, work and trips to the shore (of course!) and I haven't been able to take five minutes to update. I have been working on a couple of projects though that I will retrospectively post here.
The first project that I finally finished this summer was a tattoo design I did for one of my friends. Sunflowers are her favorite flower so of course they are the star of the tattoo. She has a degree in biology so asked that one of her favorite things, caffeine, be included as a molecule in the design. This is what I came up with for her.
I first sketched a bunch of ideas and this is the one we decided to go ahead with. First, I painted it with gouache, but did it again in illustrator to get a cleaner effect. She seemed to be pretty happy with the result so I am glad. I have never designed a tattoo before so it was a challenge for me, but I was very excited to do it. What do you think?
There are some other things I have been working on but they will have to wait for another time to be posted here. I feel like I haven't been in my studio in a long time, and I am itching to get back to painting! No worries though, I will get back to updating again regularly.
I hope everyone is enjoying the hot summer weather!

Wednesday, March 7, 2012

Poppies for a Cause

My sister every year organizes Coffeehouse for A Cure; a coffeehouse and raffle to raise money for the Children's Tumor Foundation (a cause very near to our hearts). Each year, I like to donate a painting to be raffled off to do my part in helping. Of course, I always decide to do things at the last minute, and so couldn't post a picture before the actual event. I did decide to document my process a bit with this project so you could see more how I work.
the thought process
First I started with a sketch in my sketchbook. This was quick, and unfinished, but I wanted to scan it in and do a color comp (yes I am impatient with that). The first row of the above picture is the original picture of the flowers I took a couple summers ago, the quick sketch and the quick color comp.
The second row is a cleaned up sketch that I did with tracing paper and pen, from there I got the color comps to the right. The gray background was a happy accident. I went to fill the background in Photoshop with a blue but had scanned the file as a grayscale file so it came out gray. I liked the way that looked against the orange so I kept it. I also decided to keep the grass in the background gray as well, simply outlined in white so that the flowers really popped. I was really happy with this as a color comp.
the painting process
After I had printed this out, I mixed my colors and got to work. For this piece I used gouache. Gouache and watercolor are my favorite media, and for this, since I was going for more of a graphic look, I decided to use gouache. Basically this is all the different stages of the painting.
the workspace. Pretty neat for me actually. and of course my coffee is always near.
the final painting (before I signed it)
Unfortunately, I forgot to get a picture of it when it was framed and looked all nice and pretty. I did scan it before I framed it, so I put a black frame around it in photoshop so you could get the idea of the final project.
I was really happy at the event because the painting seemed to get a lot of tickets, more money for The Children's Tumor Foundation!!! The winner was my younger sister's friend, who was ecstatic (she told me afterwards she was one of my biggest fans).
I love being able to share my talents to raise money for such a cause, and actually had a lot of people come up to me afterwards to say how much they loved it (always a good ego boost :) ).  I would love to be able to do this more in the future. But back to the drawing board. I hope not to leave this blog for as long this time without a post. Also need to get the much promised revised website up. Well, as an illustrator, your work never seems to be done.
Hope you enjoy the painting!